

Tutorials take a lot of time & effort to create, and I choose to make mine available for free. If you enjoy this guide, you can support me with a donation that feels right for you, here.
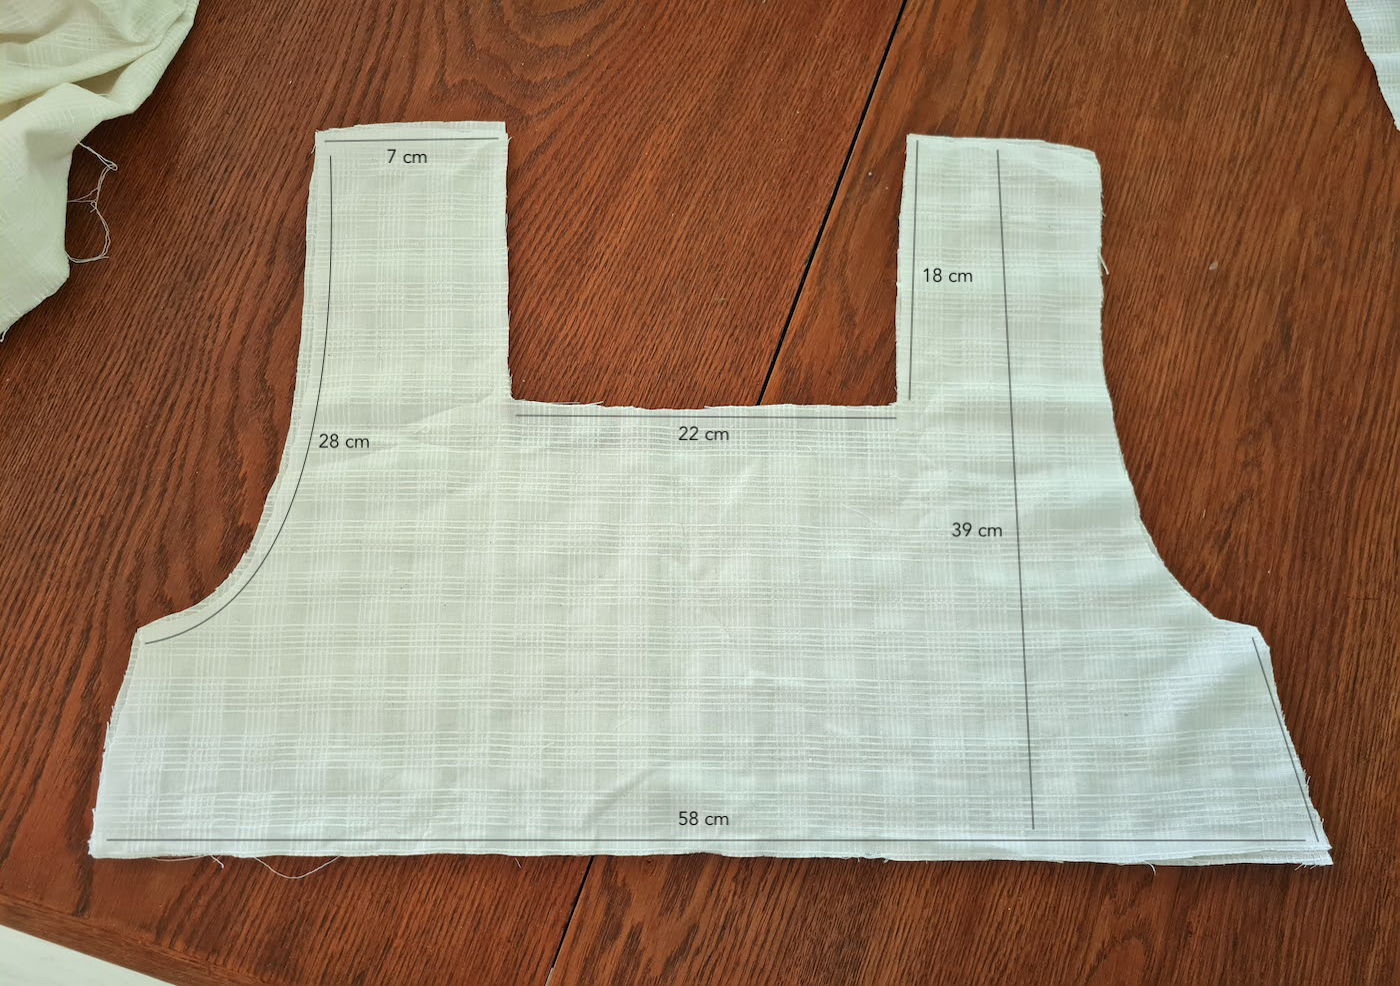
I. Here are my top pieces with measurements - if hacking a pattern, just cut your top or dress piece out and replace the neckline shape by cutting out a rectangle like so. If selfdrafting a dress or top, I've included the other measurements of the top pieces as well. I cut the back piece neckline just a couple cm deeper than the front (you can sort of make out the difference through the fabric). I went for a loose-fitting style, I'm EU36/US4 but this would also fit a size up.
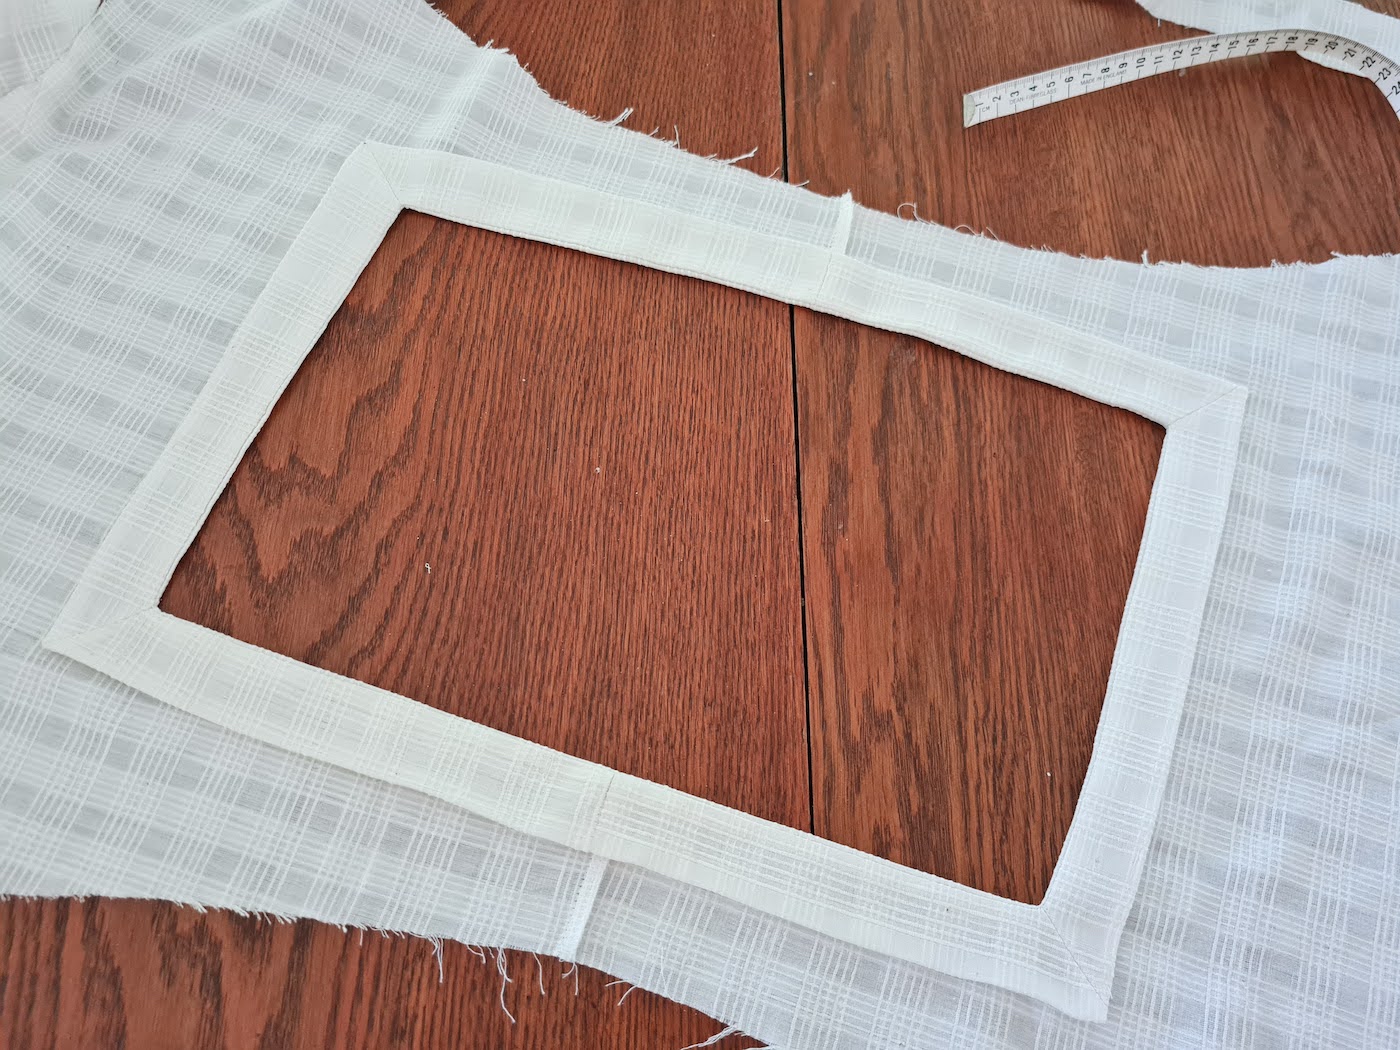
 III. Now flip the lining onto the reverse side of the top and press. Then fold the edges of the lining under (I did a 0.5 cm fold).. And you're ready to sew all around, right at the edge of the lining piece.
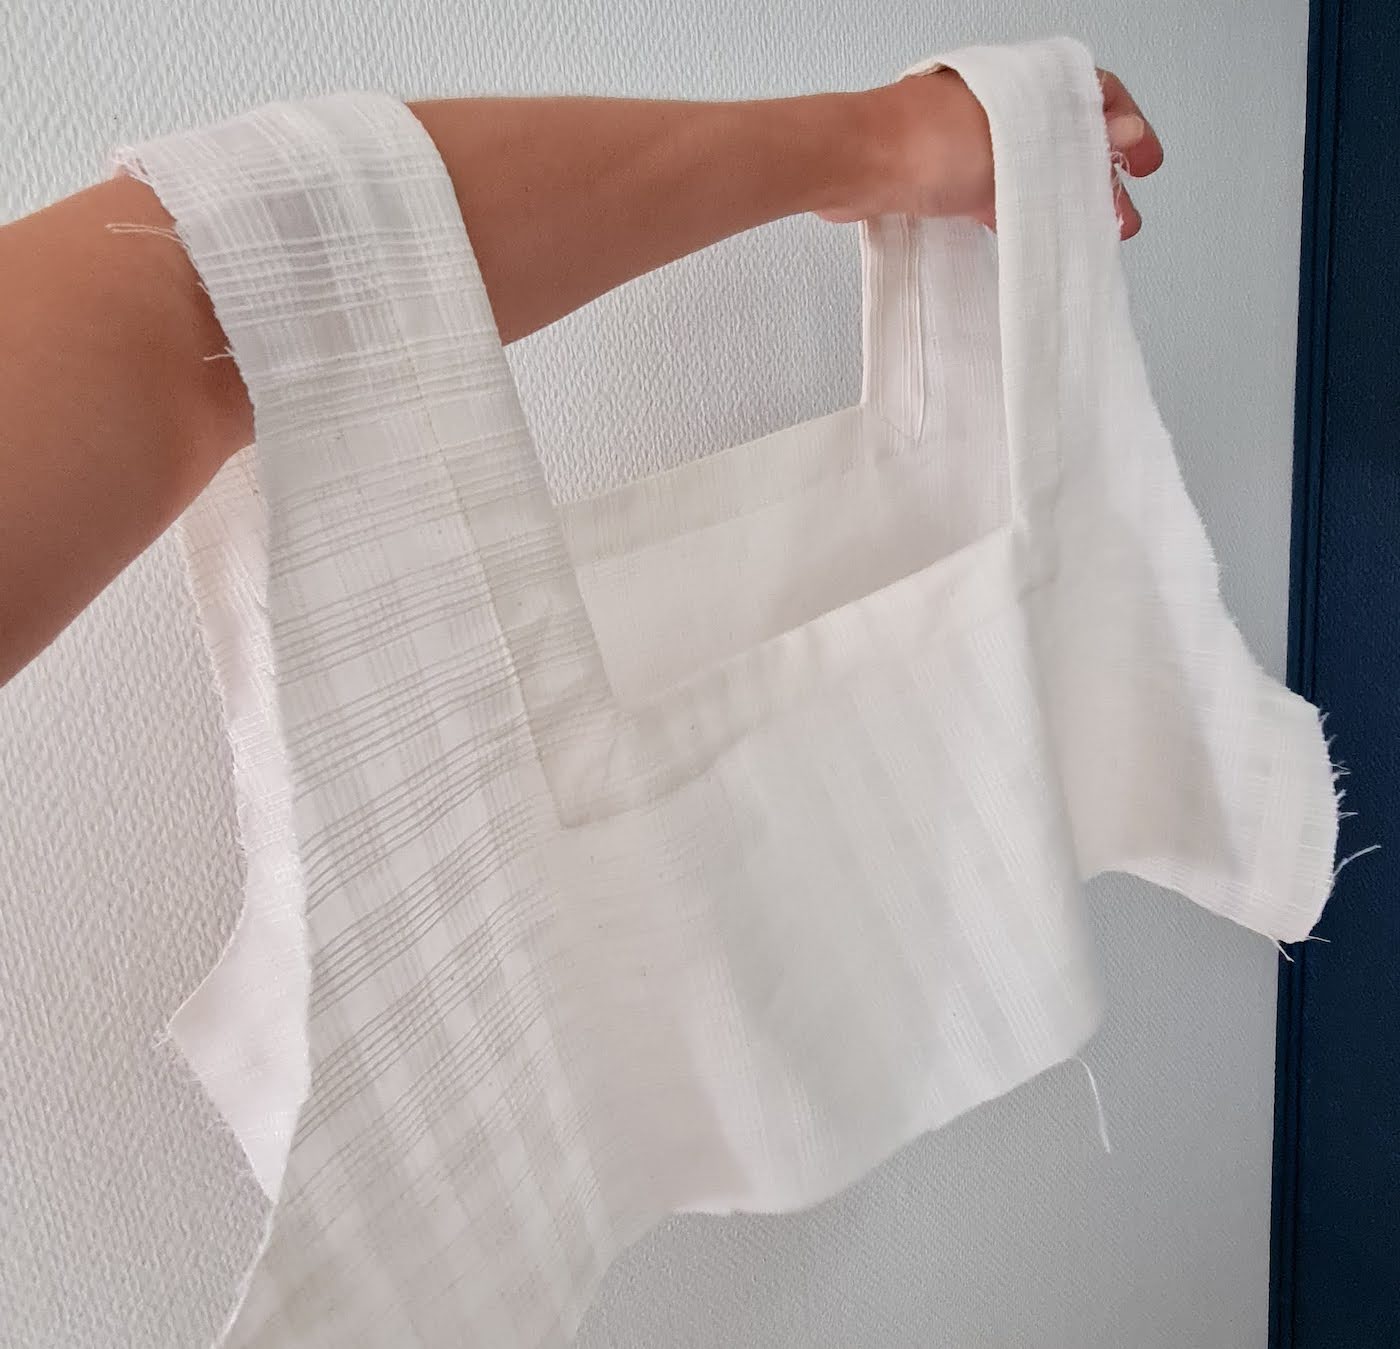
IV. You're done! Continue assembling your garment based on your pattern, or if you want to recreate this dress: I did puff sleeves (I have quite a few posts that show different styles, here and here for example), + a gathered hem from 2 rectangles, each double the width of my top piece hemline (about 120 cm). You could also do an exposed ruffle like I did here.


 xo,
xo,
II. Next I sewed the top shoulders together & cut the facing piece - a rectangle that matches the neckline. I was working with very limited fabric, so I cut mine from scrap pieces which I sewed together. A much easier way to get to the same outcome is to lay the top (with shoulder seams done) on your fabric, and trace the neckline rectangle. Then measure about 4 cm out from your rectangle (or however wide you want the lined neckline to be) and cut out the facing in one single piece. Then pin it right sides facing onto the neckline, and sew all around. Make sure you clip the corners - careful not to cut into your stitch - to release the tension before turning over.

The last thing I did was to add strings to each side of the neckline at the back, about 5 cm down from the shoulder, to be able to tie together and keep the neckline from falling down at the shoulders.
The only thing I will change later on is to switch the tie-up strings at the back to something lighter. I didn't have any suitable ribbon while making this, so made some from the same fabric, but it's too stiff for this purpose.


Julia


Looking good.
ReplyDeleteThe 2025 update of Bhulekh MP brings a sleek dashboard for faster access to Khasra, Khatauni, Bhu Naksha, and more—without logging in. New features let users download digitally signed records, purchase village maps, track transactions, file grievances, and even view data-cleansing reports. Plus, the government is exploring drone-based mapping for precise land surveys across districts. Overall, it’s a smart, user‑friendly upgrade helping everyone—farmers, buyers, and officials—access transparent land information online.
ReplyDeleteIn moment’s digital age, access to important documents and records has come easier than ever. One similar salutary service is **" Apna Khata" **, an online land record gate initiated by the ** Government of Rajasthan **. This digital platform enables citizens to pierce land- related information accessibly without visiting government services. By bringing translucency and effectiveness into the system, Apna Khata is revolutionizing how land records are managed and penetrated in the state. https://apnakhataonline.com
ReplyDeleteapna khata
ReplyDeleteAnother debit is the lack of harmonious updates and support. While the original Remini app is constantly streamlined with bug fixes and new features, Mod APK performances may lag before, leading to app crashes or comity problems with newer Android performances.remini
ReplyDeletePikashow Apk is downloaded by more people than the show on TV. This app is used by different types of people in different fields. This apk is very important in showing different live shows like pikashow. A variety of sports shows live. Who likes playing cricket more.
ReplyDeleteDelta Executor is a important Roblox script factor that offers smooth performance and wide script comity. Its stoner-friendly interface and regular updates make it dependable for players, though responsible use is important to avoid pitfalls and maintain account security. delta executor
ReplyDeleteMP Bhulekh is a very useful online portal that makes land records easily accessible for citizens of Madhya Pradesh. It provides transparency, saves time, and reduces paperwork by allowing users to check ownership details, maps, and documents conveniently anytime.
ReplyDeleteMeebhoomi is an excellent digital platform launched by the Andhra Pradesh government to provide transparent access to land records. It helps citizens view ownership details, adangal, and other property data online, making land management simpler, efficient, and corruption-free for everyone.
ReplyDeleteMeebhoomi is a progressive computerized activity propelled by the Government of Andhra Pradesh to make arrive records effortlessly open to the open. Presented in 2015 by the Income Office, this online stage points to bring straightforwardness, comfort, and proficiency to the prepare of overseeing and confirming arrive possession. It has gotten to be one of the key e-governance administrations in India, engaging citizens by giving imperative arrive data without the require to visit government offices.
ReplyDeleteBihar Bhumi, also known as Bihar Land Records Portal, is a remarkable initiative launched by the Government of Bihar to digitize and simplify land record management across the state. This portal, developed under the Department of Revenue and Land Reforms, aims to provide easy access to all land-related information online,
ReplyDeleteSpeakers are basic for getting a charge out of music, recordings, gaming, and calls, but they can every so often halt working, sound misshaped, or ended up calmer than regular. When these issues emerge, numerous individuals look for “fix my speaker” arrangements trusting for a fast and viable cure. The great news is that most speaker issues can be unraveled at domestic with basic investigating steps.
ReplyDeletePatta Chitta is an essential online land record system in Tamil Nadu that provides detailed information about land ownership, type, and area. The Patta is a legal ownership document issued by the government, while the Chitta contains details about the land, such as classification (wet or dry land) and its extent. Together, they help verify property ownership, prevent disputes, and ensure smooth land transactions. Citizens can easily view or download Patta Chitta details online through the official Tamil Nadu e-services portal.
ReplyDeleteThe Apna Khata might feel it’s a convenient way to access land records without visiting offices. They may appreciate its transparency, time-saving benefits, and how it empowers citizens to check details independently, making property information clearer, reliable, and more accessible for everyday users.
ReplyDeleteRTPS Bihar is an important online platform that helps citizens access essential government services quickly and transparently. Through this portal, people can easily apply for certificates like caste, income, residence and many other public services without visiting offices multiple times. It saves both time and effort while ensuring accountability and fast processing. RTPS Bihar promotes digital governance and brings government services closer to the people. Overall, it empowers citizens with convenience and efficiency in daily documentation needs.
ReplyDeleteDelta Executor delivers smooth, powerful script execution with impressive stability. Its fast performance, user-friendly interface, and regular updates make it a reliable choice for gamers and developers. A great tool for those seeking efficiency, customization, and consistent execution results. delta executor download
ReplyDeleteThis guide explains how to sew a square neckline in a simple way. You cut a rectangle shape, add a matching facing, sew carefully around the edges, clip the corners, then turn and press. It creates a neat, structured look. Like following steps on MP Bhulekh, clear instructions make the process easy and stress-free.
ReplyDeleteWebsite: https://mpbhulekhh.com/
Visit my website
ReplyDeleteThis square neckline tutorial is clear and easy to follow. Cutting a simple rectangle, adding a facing, and carefully sewing the corners creates a neat, modern shape. The extra tips about puff sleeves and gathered hems are helpful too. Like using MP Bhulekh, step-by-step guidance makes everything simple and manageable.
ReplyDeleteWebsite: mp भूलेख
This tutorial clearly explains how to create a structured square neckline by cutting a rectangular shape, sewing the facing, clipping corners, and pressing for a clean finish. It is very helpful for beginners because the steps are simple and easy to follow, and the idea of using scrap fabric is also inspiring. Just like learning sewing skills improves confidence, awareness about housing schemes is also important. For rural families, pmayg
ReplyDeleteThrough this, a user can use a single ID to access various government services such as job applications, bill payments, scholarships, registrations, etc. SSO ID Login
ReplyDeleteBhulekh UP is a useful online portal that helps citizens check land records, khasra, khatauni, and ownership details easily. It brings transparency to property information and reduces the need to visit government offices, saving time and effort for farmers and landowners.bhulekh up
ReplyDeleteSuch a clear and helpful tutorial! The step-by-step process makes it easy to understand how to create a clean square neckline, especially the tips about cutting a rectangular shape and clipping the corners for a neat finish . I also liked how you explained using a facing and pressing it properly, which really improves the final look. प्रधानमंत्री किसान सम्मान निधि से जुड़ी खबरें
ReplyDeleteThis guide is perfect for beginners and anyone who wants to experiment with stylish neckline designs.
This tutorial explains how to create a clean and structured square neckline by cutting a rectangular shape, attaching a matching facing, clipping the corners carefully, and turning it neatly inside for a polished finish. I found the steps simple and very beginner-friendly, especially the tip about clipping corners to reduce tension. Adding small details like back ties is also a great idea. Overall, a helpful guide—pradhan mantri kusum yojana
ReplyDelete—presented in an easy and practical way for sewing enthusiasts.
This tutorial explains a simple method to create a clean square neckline by cutting a rectangular shape, attaching a matching facing, sewing carefully around the edges, and clipping corners for a neat finish . I like how it breaks the process into easy steps, making it beginner friendly and practical. Adding details like pressing and finishing really improves the final look. The idea is useful for customizing outfits creatively, and even terms like shala darpan portal
ReplyDeletefit naturally into broader design discussions.
With UP Bhulekh, checking land ownership and property details has become more accessible than ever. The platform allows users to search records using district, village, or plot details, making the process simple and convenient. It reduces dependency on manual records and helps avoid disputes by providing transparent information. Ideal for individuals, businesses, and legal purposes, this system ensures quick access to verified land data. As digital services continue to grow, up bhulekh भूलेख खसरा खतौनी stands out as a valuable tool for efficient and secure land record management.
ReplyDeleteLooking for a private cabin for rent in West Delhi? G Connect Spaces in Hari Nagar offers fully-equipped cabins designed for productivity and comfort. Perfect for professionals and small teams, our cabins come with high-speed internet, ergonomic seating, and a peaceful work environment. Experience the best coworking space in West Delhi tailored to your business needs!
ReplyDeleteG Tech Web Marketing is recognized as India’s #1 digital marketing agency, delivering cutting-edge online marketing solutions tailored for growth and impact. With a proven track record in SEO, social media marketing, PPC, and web development, the agency empowers businesses to build strong digital footprints. Their client-focused approach, data-driven strategies, and innovative campaigns consistently drive results across diverse industries. G Tech Web Marketing stands out for its commitment to excellence, creativity, and measurable success in the digital landscape.
ReplyDeleteHey we found this article on google and it’s really a very Informational article, and we apologize for including the blog link here, thank you
ReplyDeletePPU Result Portal
BPSC Online
Bihar Bhumi
RTPS 4 Bihar
Sarkari Bihar BEd
PMS Online Bihar
Sarkari Result CTET
MPTAAS Scholarship Portal is an online platform operated by the MPTAAS to help students from Scheduled Tribe (ST) communities apply for and manage scholarships efficiently.
ReplyDeleteThrough this portal, students can register, fill out scholarship forms, upload documents, and track their application status in real time. It ensures transparency, reduces paperwork, and provides direct financial support through a streamlined digital process, making education more accessible for eligible students.
Managing land information has become much simpler with digital access to records, especially through services like UP Bhulekh Khatauni , which provide detailed ownership data online. It allows users to check important details such as the name of the landholder, plot numbers, land area, and type of land without visiting government offices. This system is particularly helpful for farmers, property buyers, and anyone needing to verify land records quickly and accurately.
ReplyDeleteA JEE Main Rank Predictor is a tool that estimates your All India Rank (AIR) based on:
ReplyDeleteAn IBPS Clerk Mock Test
ReplyDeleteis a simulated version of the actual exam designed to replicate:
Low-Cost Meeting Rooms Available in Mayapuri offer affordable, fully-equipped spaces for your business needs. Perfect for meetings, workshops, and conferences, these rooms provide all essential amenities without compromising on quality.
ReplyDeleteThe ivermectin fenbendazole combo pack in USA offers a convenient option for those seeking antiparasitic support. This combination is commonly discussed for parasite management and wellness protocols. Always use responsibly and consult a healthcare professional before considering ivermectin or fenbendazole products.
ReplyDeleteAt its core, SSSMID
ReplyDeleteis a unique identification number assigned to every registered resident of Madhya Pradesh, enabling seamless access to dozens of government programs — from education scholarships to old-age pensions.
Access to scheme-related information has become much easier with ladli behna yojana login, allowing beneficiaries to check their details anytime without hassle. Through this feature, users can view application status, payment updates, and other important information in one place, making the process more organized and user-friendly. ladli behna yojana login eliminates the need to visit offices repeatedly, saving both time and effort for women, especially those in remote areas. It also promotes transparency by giving direct access to personal records and updates. As more women start using this digital facility, they are becoming more confident in handling online services and staying informed about their benefits. Overall, this system not only simplifies access but also encourages independence, awareness, and active participation in government initiatives.
ReplyDeleteVisit: https://ladlibehnayojna.com/
The मुख्यमंत्री मैया सम्मान योजना official website serves as a dedicated online platform designed to provide complete information about the welfare scheme aimed at supporting women, especially mothers, in society. This website acts as a central hub where users can easily understand the purpose, benefits, and eligibility criteria of the योजना without any confusion.
ReplyDeleteThe pm विश्वकर्मा योजना helps ensure faster processing and better transparency. It connects eligible beneficiaries directly with government support, including financial assistance, skill training, and modern tools.
ReplyDeleteEfficient identification systems are essential for improving access to government services, and समग्र आईडी serves as a reliable solution for managing citizen information. It provides individuals and families with a structured way to store and update their details, making it easier to apply for various welfare schemes. The system helps reduce paperwork and ensures that records remain organized and accessible. Many users find it convenient to verify their information, check eligibility, and update data without visiting multiple offices. This digital approach saves time and enhances transparency in service delivery. As technology continues to improve, better accessibility and faster performance can further enhance the user experience. With its growing importance in digital governance, समग्र आईडी supports efficient administrative processes and helps deliver public benefits more effectively. Overall, it contributes to a smoother, more reliable, and user-friendly system for citizens.
ReplyDeleteVisit: https://samagraidd.com/
Reach your customers instantly with our trusted Bulk SMS Service in Mumbai. We offer fast, reliable, and cost-effective messaging solutions tailored for businesses of all sizes. Whether you need to send promotions, updates, or alerts, our platform ensures high delivery rates and real-time tracking. As a leading provider in Mumbai, we help you connect with your audience effortlessly. Boost your marketing campaigns and customer engagement with our easy-to-use SMS service. Choose us for seamless communication and unmatched support in the heart of Mumbai.
ReplyDelete“अपना खाता नकल कैसे देखें” is a useful and informative search phrase for individuals who want to access copies of their land records online in a simple way. It helps users understand how to view important documents such as Khasra, Khatauni, and Jamabandi without the need to visit government offices. By following the process of “अपना खाता नकल कैसे देखें”, people can save valuable time and effort while also ensuring better transparency in land record management. This digital approach allows users to quickly verify their property details and stay updated with official information. It is especially helpful for those living in rural areas where accessing such services offline can be difficult. Overall, “अपना खाता नकल कैसे देखें” is an effective way to promote digital access and provide citizens with a convenient method to check and manage their land records.
ReplyDeleteRead More: https://apna-khata.com/
Bihar Service Plus is an efficient digital platform that simplifies the way citizens interact with government services by bringing multiple सुविधाएँ under one system. With Bihar Service Plus, users can easily apply for different services online, upload documents, and track their application status without facing unnecessary delays or confusion. The platform is designed to be user-friendly, ensuring that even people with basic digital knowledge can navigate it smoothly. It reduces dependency on physical visits to offices, which ultimately saves time and effort. Bihar Service Plus also promotes transparency by keeping the entire process clear and trackable at every stage. This modern approach not only improves service delivery but also builds trust among users, making government services more accessible, reliable, and convenient for everyday needs across the state.
ReplyDeleteRead More: https://rtps-biharr.com/
Accessing land information has become much more convenient with the introduction of digital services like अपना खाता देखें राजस्थान, which streamline the entire process for users. Instead of dealing with time-consuming paperwork or visiting offices, individuals can now view property records, ownership details, and land data online with ease. This system enhances transparency and helps reduce errors or disputes by providing reliable information instantly. Farmers, landowners, and buyers especially benefit from the quick access and clarity it offers. By using अपना खाता देखें राजस्थान, people can make informed decisions without unnecessary delays. Furthermore, such platforms encourage the adoption of digital tools, improving overall efficiency in public services. With a user-friendly interface and secure access, this initiative supports better governance and ensures that essential land-related information is always within reach, making life simpler and more organized for citizens across both rural and urban areas.
ReplyDeleteRead More: https://apnakhataa.com/
WhatsApp Business API is a scalable communication solution that enables businesses to connect with customers on WhatsApp at scale. It supports automated messages, notifications, and customer support through verified business profiles. With rich media, templates, and chatbot integration, brands can deliver personalized experiences. The API ensures secure, reliable, and real-time communication. It is ideal for customer engagement, alerts, and transactional messaging.
ReplyDelete